

Hosta Jobs..... to do over the Easter Weekend
- John Plant

- Mar 29, 2024
- 5 min read
Easter weekend is probably the first chance everyone will get to spend a little time in the garden. The weather has picked up a little, and you have 4 whole days, in which tackle all those little jobs you have been putting off, until now.
It turns out that there is a positive mindset, to getting outside, and enjoying a bit of fresh air in the garden, when Easter arrives. For some, this is the weekend they have all been waiting for. The first time of any significance in the garden.
Everything is starting to come to life. The shrubs are bursting into leaf. Spring flowering shrubs are well under way, and Hostas are all bursting through the soil surface and are well advanced in containers.
This is also a significant weekend for us, here at Rewela Hostas. We will have done a lot of regular maintenance by now, but there is still plenty to do.
We will break our Easter Maintenance regime down into bit-sized chunks for you to follow. Where we can, supporting the tasks with photographs and maybe the odd video. Give your Hostas some tender loving care.
Top Dressing

Most of our pots have already been top-dressed but will want a little extra where needed. Our top-dressing is ordinary compost, with a bit of home-grown compost mixed in. This should leave enough room, at the top of the pot, for watering.
One of the big issues that we have is, that once the top dressing has been done, the birds, particularly the Blackbirds, see fresh compost and go looking for food. They seem to ‘hoof’ out an awful lot of the hard work you have already done. This won’t hurt the Hostas, as they are in the compost, but it does make an unsightly mess around the pot. Just keep on top of them with either fresh compost or clean up & use the excavated compost. Tidy the top of the pot once a week or so, until the birds stop digging.
Watering
At this time of year, you shouldn’t need to worry about watering. Especially this year. It seems to have been raining constantly, since October last year. If anything, the pots are just a bit wet. Perhaps we should mention drainage.
Drainage

Where the pots are set on a surface, that is reasonably drained, such as gravel, it shouldn’t be an issue. However, where the containers are set on a hard surface, such as paving, or a patio each pot should be raised off the ground a little, to assist in drainage.
There are many ways to do this using proprietary methods. You can buy a range of ‘feet’, which sit beneath the pots and raise the pot from the ground. These work just fine, but, if like us, you have hundreds of pots to raise from the patio, this can be a little financially restrictive.
We have a hack, that works just as well and is FREE. It is also good for the environment, reducing plastic waste. Save you plastic bottle tops, from your milk, orange juice cartons, or larger water (2ltr) bottles.
These can be placed under the pots the same way as the feet, and do exactly the same job, and they’re free.
May I suggest that the surface is clean before you decide to do this. You don’t want to have to move them all, to clean to patio beneath.
Cleaning The Pots


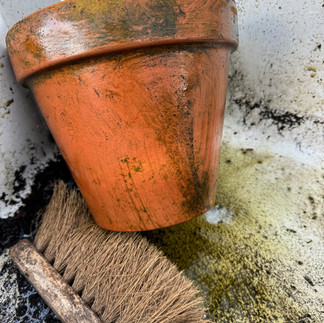


Over a period of time even those lovely clay pots lose their clean look. The tend to get covered with a green algae, that makes the pots slippy to handle and in my mind, looks dirty and untidy.
Whilst cleaning the paving or patio, give your pots a quick wash too. Warm soapy water and soft brush usually does. They will look so much better.
Labelling

This will apply to pots & containers and planted specimens in a border.
A lot of people don’t actually care about the name of a Hosta, and that’s fine. Just ignore this section.
However, if you have paid good money, for a named variety, it would be a shame to lose its identity.
Running a Hosta nursery, labelling is one of the most important jobs to keep on top of. It is paramount that we know exactly what each pot or container contains or indeed what is planted where.
You will note that we have 2 labels in each pot. The yellow printed label and a plastic white ‘T’ label. The yellow label identifies the Hosta and is pushed into the compost well. However, this is not always enough, as the Blackbirds love nothing better than throwing the out of the pot. So we do have a third label, a 4” handwritten plastic label, pushed fully into the compost. (especially to combat the Blackbirds).
The white ‘T’ label is simply so we can read it without having to pull it out of the pot or container. It is also sited at the front of the pot for ease.
If you have ‘named’ varieties that you want to keep named, then a labelling regime of some sort is essential. This is as important in the open ground/borders as in pots and containers. Easter is a great time to do this.
There are many different versions of labels that can be used. The choice is yours.
Where Hostas are in borders, why not do a small diagram of which Hosta is planted where. It’s fun to do, and can be done if it’s raining.
Slug & Snail Control

These horrible little molluscs may be small, but can cause a lot of damage. They will have come out of their winter sleep and are now looking for something to eat. I won’t go into too much detail as we have covered this in a recent blogs, here are the links.
However, this is now the time to act.
Splitting
Hostas can be split at almost any time of year, however, Spring is recommended to be a good time to split your Hostas. This will keep the host Hosta healthy by reducing its mass. It will also increase your Hosta stock, and you could even give some away to friends and neighbours.
Protection From Frost.


Yes! Even now, we can still get a hard frost.
Hostas, once established are hardy plants. However, at this time of year, with all the newly formed, tender shoots, the younger Hostas can be at risk of being frosted.
Keep an eye on the overnight weather forecasts and be prepared.
If you have lots of pots together, covering with fleece would give some protection. Where you have pots, spread out, where fleece wouldn’t be appropriate or practical, you can still give some protection, by covering the pots with upturned pots. You only need to do the ones that have some growth. The semi-dormant ones probably don’t need any protection.
Planting Hostas.

Hostas can be planted at most times of the year, with or without foliage. However, if you have waited for your Hostas to come into leaf before you plant them, you can now see what you have. You can now plant up your display pots or borders.
Finally, enjoy your weekend. Take a bit of time out for yourself.
To learn more about Hostas, you may be interested in reading : What Are the Common Mistakes to Avoid When Growing Hostas?, Ways to Protect Your Hostas from Slugs and Snails and "Uncovering the Advantages of Bare Root Hostas:
Shop for Hostas HERE

John Plant
Rewela Hostas


Comments